
Soldering Robot Cost per Joint by Southern Machinery
Cost per joint is the only honest way to compare hand soldering with a soldering robot, and it is built from four inputs every factory already owns: the hourly cost of a soldering post, the seconds a joint takes, the tips and tin wire consumed, and the rework cold joints trigger. Southern Machinery's S-C5331R dual-table desktop soldering robot completes 18 pads across both tables in a 27-second cycle, solders at 0-500 degrees C with roughly 0.1 s tip recovery, and is programmed from a teaching box that stores more than 100 programs. This guide gives the cost-per-joint formula, the documented specifications, a worked payback example and the configuration checklist.
Oct 7, 2026 · Updated Oct 7, 2026 · Southern Machinery
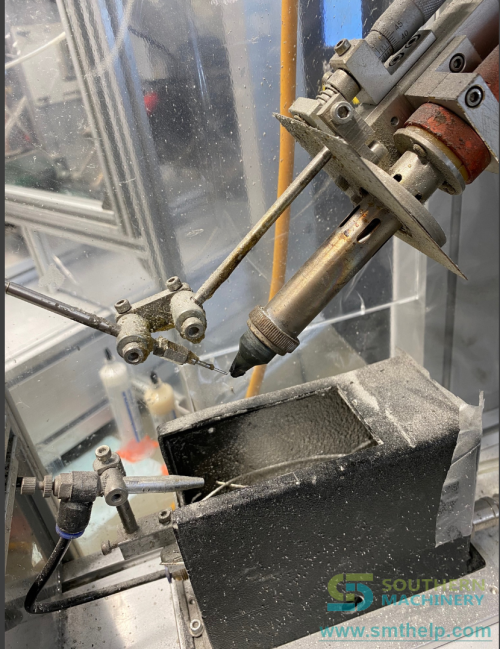
What a soldering robot costs per joint is not a price-list question. It is the sum of four inputs you already own: the hourly cost of a soldering post, the seconds each joint takes on your bench today, the tips and tin wire that bench consumes, and the rework every cold joint triggers. Southern Machinery publishes one figure that makes the arithmetic possible for its dual-table desktop soldering robot — the S-C5331R completes 18 pads across both tables in a 27-second cycle, with one operator loading and unloading while the robot solders. From that figure you can work out the soldering robot cost per joint for your own board before you ask anyone for a quotation.
What does a soldering robot cost per joint?
The formula, in four terms
Cost per joint = (labour rate per hour x seconds per joint / 3,600) + consumables per joint + rework cost per joint.
Labour is the fully loaded hourly cost of one post multiplied by the seconds a joint takes. Consumables are tips, tin wire and cleaning materials divided by the joints they last. Rework is the share of joints that fail at test multiplied by the cost of reworking one board. Add the three terms and you have the number the bench really charges.
What Southern Machinery documents for the S-C5331R
Every value below is quoted from the source product document for the machine.
- Cycle performance: a test result of 18 pads across both tables in a 27-second cycle.
- Temperature: 0–500 °C with a precise temperature controller; the tip recovers to set temperature in about 0.1 s.
- Tables: two work tables (Y1/Y2) running in one cycle — the operator loads one while the robot solders the other.
- Axes and travel: X/Y1/Y2/Z; effective distance X 300 mm and Y 300 mm; moving speed 0–400 mm/s.
- Processes: spot soldering and drag soldering with high-precision, program-controlled tin feeding, plus a built-in cleaning box for tip maintenance.
- Rotatable option: adds an R axis for angled and side-entry joints.
- Utilities and footprint: 220 V mains, no compressed air required for standard operation, 68 kg on a workbench.
- Programming: HD handheld teaching box, capacity for more than 100 programs; operators learn the machine in about one day.
- Applications named in the document: IC, PCB, LCD, relays, loudspeakers, optical lens, USB, LED strip, CFL base and automotive parts.
Why does hand soldering look cheaper than it is?
A bench of irons costs almost nothing to set up, which is exactly why its cost stays invisible. The document lists what accumulates behind that low entry price.
Output follows headcount
Each operator adds a few hundred joints per hour, so growth means hiring rather than improving. When the bench sets the pace, faster SMT equipment upstream changes nothing.
Cold joints cost twice
A cold joint fails at test, needs hand rework, and the rework itself risks the board — which is why the document calls it the most expensive joint to make. By the second half of a shift, tip angles and dwell times drift, and hand feeding over-uses solder wire while uncontrolled tip temperature burns tips early. Those are costs nobody tracks per board.
Skill is a turnover risk
A skilled solderer is months of training, and every resignation resets the quality curve of the bench.
What does the S-C5331R change on the floor?
Two tables, one cycle
The operator loads a fixture on table Y1 while the robot solders on Y2, then the tables swap. The published 18-pad, 27-second test result is measured this way.
A tip that recovers in about 0.1 s
Heat-sucking pads are where hand soldering produces cold joints. Constant temperature control across 0–500 °C with about 0.1 s tip recovery, keeps dwell time repeatable instead of dependent on how hard an operator presses.
A teaching box, not a programming course
Paths are taught on the HD teaching box, which stores more than 100 programs; operators learn the machine in about one day.
Which configuration should you compare?
- Entry configuration: single-head, single-station layout, working stroke 200 x 200 x 200 x 100 mm, for light duty.
- Maximum throughput: dual-head, dual-station, working stroke 500 x 300 x 300 x 200 mm (X x Y x Z x R), positioning speed up to 500 mm/s, repeat positioning plus or minus 0.02 mm — the document's recommended high-volume configuration.
- Safety and fume containment: enclosed machine with protective cover.
- Two processes on one frame: dual systems at front and back for complex boards.
- Drive choice: stepper motors for standard joints, servo drive for fine-pitch and high-precision work.
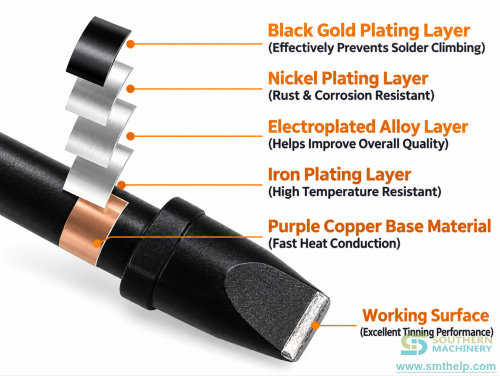
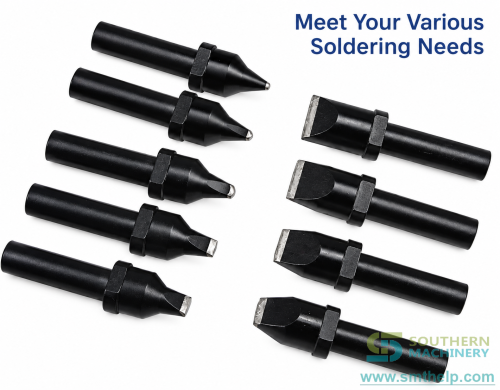
- Consumables and tooling: custom soldering tips and PCB fixtures designed from your samples, plus a solder breaker and cleaning box.
- Open item: price, delivery and final configuration are confirmed only after technical review of your boards, joints and volume.
How do you calculate payback?
Use this structure and put your own numbers in.
- Annual direct labour = posts x shifts x productive hours x fully loaded hourly rate.
- Bench cost per year = that labour + consumables + rework.
- Robot cost per year = (machine price + fixtures + training) / years of service + reduced consumables + reduced rework.
- Payback in months = machine investment / monthly saving.
Worked example — illustrative, depends on configuration, subject to final technical confirmation. Three operators at an example 300 joints per hour each, from the document's "a few hundred joints per hour", give 900 joints per hour. The published test result converts to 18 / 27 x 3,600 = 2,400 pads per hour when the robot runs continuously, a derived figure that assumes no idle time. If the robot replaces two direct posts and one supervisor remains, multiply the two posts avoided by your productive hours and hourly rate, add the rework that disappears with the cold joints, and divide the machine investment by the monthly saving. The product document states that a bench of three hand-soldering operators produces the work of one S-C5331R and that payback is typically measured in months, not years. — the supplier's statement about typical projects, not a guarantee.
Where does the robot sit in a PCB assembly line?
Point-soldering robots take the joints a wave cannot reach cleanly: connectors, relays, shields and single-sided parts. In a THT line the sequence is insertion, then soldering, then inspection and test. Southern Machinery supplies the insertion stage with the S7000 odd-form insertion machine, the wave and selective stage with the wave soldering machine range, and the wider THT machine range; the S-C5331R sits after insertion and before test on boards that tolerate neither a wave nor a hand iron. Related reading: the S-C5331R and S-HX331R desktop solder robot family comparison and the THT auto-insertion line. Machine documentation is at file.autoinsertion.com.
What comes with the machine?
Installation runs in five documented steps: bench and fixture, utilities, programming, trial run, then training and ramp.
- Step 1, bench and fixture: a stable workbench, with the PCB fixture designed to your board for panel size, support points and tip clearance.
- Step 2, utilities: 220 V mains; no compressed air required for standard operation.
- Step 3, programming: set temperature within 0–500 °C, teach paths on the teaching box, store more than 100 programs.
- Step 4, trial run: solder sample boards, then tune temperature, feed speed and tip height.
- Step 5, training and ramp: free installation and operator training, 24/7 worldwide support, 1-day spare-part lead time.
Questions buyers ask about soldering robot cost per joint
How do I get a cost per joint for my own board?
Send the joint count per board, the boards per month, your labour rate and the defects you scrap or rework today. The document states that Southern Machinery provides a board-specific ROI estimate within 24 hours of inquiry.
Does the robot need compressed air or a special floor?
No compressed air is required for standard operation. The machine needs 220 V mains and a stable workbench rated for 68 kg.
What temperature does it solder at, and how stable is it?
0–500 °C with a precise temperature controller and about 0.1 s tip recovery, so heat-sucking pads do not turn into cold joints.
How difficult is programming and training?
Paths are taught on the HD handheld teaching box, which stores more than 100 programs, and operators learn the machine in about one day.
Which soldering methods and options are available?
Spot soldering and drag soldering with program-controlled tin feeding; a rotatable R axis option for angled and side-entry joints, and a built-in cleaning box for tip condition.
Can the robot replace a wave soldering machine?
No. It takes the point joints a wave cannot reach cleanly. The family comparison linked above shows how the S-C5331R sits beside wave and selective soldering.
Get your own number
Tell Southern Machinery which boards you hand-solder today, the joint count per board and your monthly volume. Email info@smthelp.com or message +86 136 0256 2576 on WhatsApp, and include board samples or drawings for a dual-table demo and a board-specific ROI estimate.
Comments