
PCB Conveyor Lighting Stand Installation Guide for SMT Inspection Conveyors
Install a PCB conveyor lighting stand on an SMT inspection conveyor in four steps — bracket, lamp holder, and 110 V wiring — and give operators even light.
Sep 28, 2026 · Updated Sep 28, 2026 · Southern Machinery
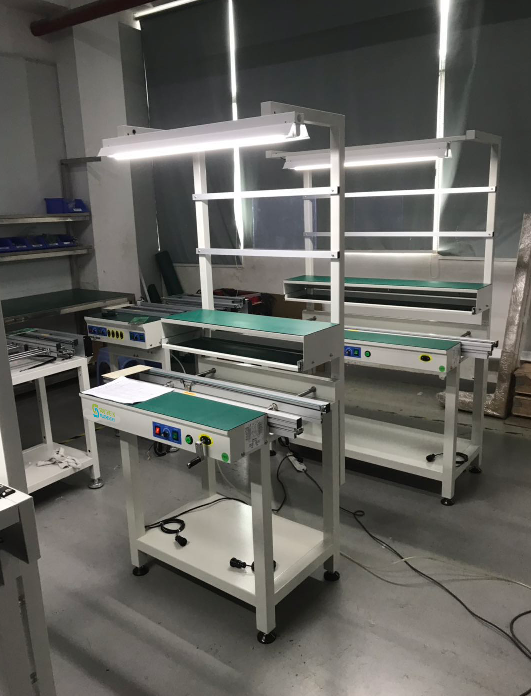
PCB Conveyor Lighting Stand Installation Guide for SMT Inspection Conveyors
On a PCB assembly line, the inspection conveyor is where a human being looks at a board with their own eyes. Everything upstream — SPI, pick-and-place, reflow, AOI — exists to reduce how often that happens, but it never removes it entirely. And when it does happen, the quality of the light matters as much as the quality of the operator.
This guide covers Southern Machinery's PCB conveyor lighting stand: what it is, the complete parts list that ships with it, the four-step installation procedure taken from the official Conveyor Lighting Stand Installation manual, and how to wire it into a conveyor that never had a lamp before.
What is a PCB conveyor lighting stand used for?
A conveyor lighting stand is a bolt-on frame that carries a 1.2 m lamp tube above a PCB conveyor, so boards moving along the line are lit evenly while an operator inspects them.
Southern Machinery's installation manual states its purpose directly: it is "used to guide the installation of the lamp holder for use in SMT production line lighting." The manual goes on to describe the PCB conveyor itself as equipment "used in the PCB assembly line when frequent visual inspection of PCBs is required" — which is exactly the sentence that explains why the lighting stand exists. An inspection conveyor without proper overhead light is a table with rollers; the lighting stand turns it into a real inspection station.
Where the lighting stand fits in an SMT / THT assembly line
The lighting stand is an accessory, not a machine, so it does not sit at a fixed station in the line. In practice it is fitted wherever boards need to be looked at:
- After reflow — first visual check of solder joints and component placement before the board moves on
- After wave soldering or selective soldering — the classic THT inspection point, where bridged and insufficient joints are caught
- After AOI — a manual confirmation station for defects the AOI flagged, so operators verify instead of guess
- Before depaneling and packing — final cosmetic and workmanship check
- On dedicated inspection conveyors — a conveyor deliberately placed in the line where frequent visual inspection of PCBs is required
Because the stand bolts to the conveyor frame rather than to the floor, it travels with the conveyor when the line is reconfigured.
Parts list — what ships with the lighting stand
The manual ships with a detailed accessory list. This is the complete bill of materials for one stand:
| Item | Name | Size | Quantity |
|---|---|---|---|
| 1 | Hard rubber sleeve (A4) | A4 | 1 |
| 2 | Energy-saving lamp | 1.2 m | 1 |
| 3 | Intermediate bracket | 1.2 m | 2 |
| 4 | Square light stand | 1.2 m | 2 |
| 5 | Screws | M6×65 | 4 |
| 6 | Screws | M6×50 | 2 |
| 7 | Screws | M4×20 | 4 |
| 8 | Screws | M4×10 | 2 |
| 9 | Light power wire | 1 m | 1 |
| 10 | Top bracket | 1.09 m | 1 |
Having the fastener sizes on hand before the stand arrives is what keeps installation a same-day job instead of a two-trip job. The two square light stands carry the vertical load, the 1.2 m intermediate brackets tie them together, and the shorter 1.09 m top bracket is what the lamp holder actually hangs from.
The installation drawing dimensions the conveyor and light stand assembly at a 990 ± 20 mm working height — an ergonomic figure that keeps the inspection surface where an operator can work across a full shift without stooping.
Installation in four steps
The manual breaks the job into four steps, in this order.
Step 1 — Install the bottom bracket
Secure the base bracket to the two square light stands with 4 × M6×65 screws. This is the foundation of the assembly; everything above it references this frame, so level it before tightening down.
Step 2 — Install the intermediate bracket
Secure the 1.2 m intermediate bracket to the uprights with 4 × M4×20 screws. This bracket stabilises the two uprights and sets the width of the upper structure.
Step 3 — Install the lamp holder
Step 3 has five sub-steps in the manual:
- 3.1 — Use two M6×50 screws on the top to mount the 1.09 m top bracket.
- 3.2 — Install the lamp holder connector.
- 3.3 — Fix the lamp holder to the bracket with M4×10 screws.
- 3.4 — Make the light's 110 V power cable connection.
- 3.5 — Fit the lamp cover.
Step 4 — Connect the power wire
The manual covers two distinct cases, and getting this right is what separates a clean install from a rework:
- 4.1 — The conveyor already has a light. The machine has a terminal inside, so the lamp holder power can be connected directly.
- 4.2 — The conveyor never had a light. The new light stand should be connected directly to the conveyor's internal power supply terminal block, using a new wire connection. Red wire to L, black wire to N.
That L/N convention is worth writing on the inside of the conveyor's panel during installation. It is the detail the next technician will need.
Electrical safety before you start
Before any wiring work: isolate the conveyor at its supply, follow your plant's lockout/tagout procedure, confirm the voltage and frequency available at your site against the lamp assembly supplied, and earth the stand through the conveyor frame. Wire colour conventions (red to L, black to N) come from Southern Machinery's manual; local electrical codes still govern the installation.
Why overhead lighting matters for inspection quality
Manual inspection is a visual task, and visual tasks degrade predictably when the light is wrong:
- Glare and shadow hide the defects operators are looking for — insufficient fill, solder bridges, tombstoned parts, and damaged bodies all read differently under a bare ceiling fixture than under a lamp directly above the board.
- Inconsistent light means inconsistent judgement. The same defect passed on a night shift and rejected on a day shift is a calibration problem, and the cheapest fix is a fixed, uniform light source over the conveyor.
- Fatigue compounds error. Operators leaning in and squinting at a board in poor light make more misses late in a shift. A correctly positioned lamp at an ergonomic working height reduces the effort each inspection costs.
None of this is exotic. It is the same reasoning that puts a light over a workbench — it simply gets forgotten on a production line, where the conveyor was bought for transport and the inspection station was improvised around it.
How the lighting stand integrates into a complete PCB assembly line
Southern Machinery supplies SMT/THT PCB assembly automation as line solutions rather than as isolated machines. The lighting stand sits at the simple end of that scope, but it follows the same integration logic:
- Board handling — link conveyors, inspection conveyors, buffer conveyors, turning conveyors, loaders and unloaders move and stage the board
- Inspection — SPI, AOI and X-ray catch what machines can catch; the lit inspection conveyor catches the rest
- Process stations — stencil printing, pick-and-place, reflow, wave soldering, cleaning, coating and depaneling form the process backbone
- Accessories — lighting stands, magazine racks, reel storage, feeders and nozzles keep the line usable shift after shift
If you are configuring a new line or retrofitting an existing one, the lighting stand is one of the last items on the list and one of the cheapest, which is exactly why it is worth specifying deliberately instead of adding later.
Selection checklist before you order
- Conveyor mounting interface — confirm how the stand attaches to your specific conveyor frame
- Conveyor length and lamp length — the standard lamp supplied is 1.2 m; match it to the length of the inspection zone
- Supply voltage at your site — the manual specifies a 110 V lamp cable connection; confirm what your conveyor and facility provide
- Working height — the assembly is dimensioned at 990 ± 20 mm; check it against your operators and your line height
- Spare lamp tubes and brackets — ask about spares up front so a failed tube is a five-minute change, not a line stoppage
- Retrofit vs new build — state whether the conveyor already has an internal light terminal (case 4.1) or not (case 4.2)
Typical application scenarios
- EMS / contract manufacturing — multiple product changeovers a day, all needing a repeatable inspection point
- Automotive electronics — high-reliability PCBA where visual workmanship checks are documented
- Medical electronics — small batches, strict traceability, and inspection stations that must be auditable
- Industrial control — heavy THT content after wave soldering, where bridged joints are the main defect
- LED lighting products — high board counts and long boards; inspection conveyor length and even light matter
- Power supply assembly — mixed SMT and THT boards with large components that are easy to mis-inspect
ROI, quality and throughput perspective
The lighting stand is a small line item measured against the cost of a defect that leaves the factory. A missed solder bridge or reversed component caught at an unlit inspection station costs a rework cycle; caught one process later it costs a rework cycle plus the logistics of finding and re-opening the unit; caught by the customer it costs freight, credibility and possibly a containment exercise.
Framed that way, the return is not about installing a lamp faster — it is about making the inspection step reliable enough to trust, so the people standing at it are doing inspection rather than guessing.
Frequently asked questions
What is a PCB conveyor lighting stand?
It is a bolt-on frame that mounts a 1.2 m lamp tube directly above a PCB conveyor so boards can be inspected under even, overhead light. Southern Machinery's manual describes it as the lamp holder installation for SMT production line lighting.
Which conveyors does it fit?
It is designed for PCB conveyors and inspection conveyors used in SMT assembly — the conveyors placed in the line where frequent visual inspection of PCBs is required. Confirm the mounting interface against your conveyor model before ordering.
Can I fit it to a conveyor that never had a lamp?
Yes. The manual covers both cases: if the conveyor already has an internal light terminal the lamp holder connects directly, and if it does not, the light stand is wired to the conveyor's internal power supply terminal block using a new wire connection — red wire to L, black wire to N.
What is the working height of the assembly?
The installation drawing dimensions the conveyor and light stand assembly at 990 ± 20 mm.
How long does installation take?
The manual documents four steps — bottom bracket, intermediate bracket, lamp holder and power connection — using standard M4 and M6 fasteners. With the parts staged and the conveyor isolated, it is a straightforward mechanical and single-point electrical job.
Can Southern Machinery supply spare lamp tubes and brackets?
Spare parts, sub-assemblies and retrofit kits are part of Southern Machinery's after-sales service, alongside training and overhaul support. Ask for spare lamp tubes and brackets with your original order so replacements are on the shelf.
Contact Southern Machinery for configuration advice
Tell us your conveyor type, the board sizes you run, and whether the conveyor already has an internal light terminal — we will confirm the right lighting stand configuration and the spares you should hold.
Southern Machinery Sales and Service Co., Ltd — founded in Shenzhen, China in 2011, supplying SMT and THT PCB assembly automation equipment and full-line solutions to 237+ customers worldwide, with spare parts, training and global support.
- Email: jasonwu@smthelp.com
- Phone / WhatsApp: +86 13602562576
- Machine photos and product galleries: https://ph.smthelp.com
- Catalogues and downloads: https://file.autoinsertion.com
- Website: https://www.smthelp.com
Watch the conveyor lighting setup in operation:
https://www.youtube.com/watch?v=nHR0o6y20Hg
Comments